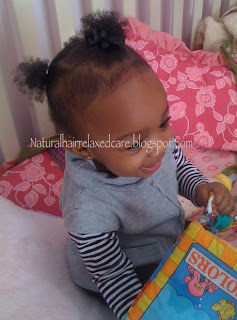
This was LA's first official hairstyle. It's called a veil and I learned how to do it from my favorite blog at the time, happygirlhair.com. This blog has since been taken down but most of the info I have learned and will share, comes from there. I will post a description of this hairstyle, as well as instructions on how to achieve this look, in the near future. I was happy with this hairstyle. I didn't let it stay in longer than a day because I thought it might pull her hair at night.
Now that I was styling LA's hair, I needed a new product to moisturize her hair. I went to the local beauty supply store and found a jar of Miss Jessie's Baby Buttercreme. I had heard about Miss Jessie's products and since the price was so high, I figured it must be good. (I will give a review of this product in another post.) I could not wait to get home and try this on LA's hair.
One thing I learned about natural hair was that you should never comb, brush or style DRY hair. With my bottle of olive oil and water and my new jar of Baby Buttercreme, I was finally ready to braid LA's hair. This is a picture of the first cornrows I ever did on LA's hair. Her hair was so thin and patchy. If you look closely at the picture, you can see where she didn't have any hair around the sides and in the back. Those two braids in the back that are hanging down the furthest were the thinnest braids out of the bunch and that hair eventually fell out too. I was SO proud of these braids. I put the beads on the ends and I just knew her hair was cute regardless of how much scalp was showing lol.
These ponytails smh. Looking back now, I can laugh at my mistakes and hopefully someone can learn from them. I thought these ponytails were everything. My poor baby lol. Look at how thin the sides of her hair were. I slicked her hair down with some Let's Jam and put her hair in 3 ponytail puffs. Nobody couldn't tell me my baby's hair wasn't looking good. Why couldn't I see how much hair she did NOT have? This is what you don't do! Even though I was making sure the rubber bands weren't pulling on her hair, I should have left her hair alone at this point and just kept it moisturized. She was still a baby so there was really no need to style her hair, especially in ponytails like this.
This style right here was my go to look. I learned that it was better to make smaller ponytails instead of trying to pull all her hair together. To achieve this look, I did finger coils. I wet her hair with the oil and water mix, added a little buttercreme and twirled sections of her hair around my fingers. This is where I started to get better at doing her hair.
Baby Hair advice
- Moisture, moisture, moisture. It is very important to keep curly hair moisturized. Olive oil and water go a long way.
- Stay away from sulfates. Many shampoos like Johnson and Johnson's baby shampoo, contain sulfates. The most common sulfate is sodium lauryl sulfate. Check the ingredients.
- If you most use rubber bands, be sure to soak them in olive oil before using. Rubber bands tend to be very try and can cause breakage. If you use rubber bands to secure beads, be sure to remove the rubber bands every other day and moisture the ends of the braids. I do this by cutting the rubber band, removing the last bead, slide the remaining bead up and oil the ends of the braids. I then apply a new oil soaked rubber band to the beads. It seems like a lot of work but it is worth it.
- Co-wash! Instead of washing the hair wish shampoo, try using ONLY conditioner every other time. There is really no need to wash the hair with shampoo unless there is a lot of product build up. Co-washing can help the hair retain moisture. I co-wash LA's hair about once a week and I use shampoo as needed.
Those are the tips I have on baby hair for right now. If you have any questions or comments, feel free to post. Thanks for reading
Nace


First You got a great blog .I will be interested in more similar topics. i see you got really very useful topics, i will be always checking your blog thanks.
ReplyDeletehairstyle for gown